2.11 Selecting Objects
Many Visual commands require that objects within the lighting model
be selected either for modification or reference. Generally speaking,
these commands may be applied to objects either individually, or in groups.
The process typically consists of object selection followed by the specification
of any information necessary to complete the particular command. Because
the object selection process is a common occurrence, Visual incorporates
a consistent routine for the sake of simplicity.
Upon initiating
any command involving object selection, the Status
bar will prompt for the selection of objects. For example,
the Move command at right. |
|

|
The mouse crosshairs
will temporarily change to a pick-box
indicating that Visual is using the Pick
selection method. To select Background
objects, Solid objects, and Calculation Zones, simply place the
pick-box over any element of the
desired object and left-click the mouse. |
|

|
In Transparent
and Rendered Display
Modes, Visual allows both the perimeter and interior
of Solid Objects to be clicked
to indicate selection. |
|

|
The object
will turn the selection color (the system default is red, but
can be user-modified in Environment
Settings) to indicate that it is selected. If more than one
object is in the pick-box area
then only a single object will be selected. To toggle through
the objects under the pick-box
simply left-click the mouse again and the next object will be
selected while the previous object will be unselected. Continue
clicking until the desired object is selected. |
|

|
The selection order of objects is based on the Z-order. This means that
the object closest to the camera is selected first. If a second click
is made on visually coincident objects, the next farthest object will
be selected, and so on. For example, in a Top
View, when clicking as in the above example, the object selected
would be the "ceiling", a second click in the same spot would
select the "wall" below, and a third click would select the
"floor". If a fourth click where made, the cycle is completed
by the "ceiling" being the selected object again.
In Transparent, Shaded,
or Rendered display mode, Solid
objects can be selected by clicking on any part of the surface. In Wireframe display mode, a bounding edge
must be clicked.
The selection order of objects is based on the Z-order. This means that
the object closest to the camera is selected first. If a second click
is made on visually coincident objects, the next farthest object will
be selected, and so on. For example, in a Top
View, when clicking as in the above example, the object selected
would be the "ceiling", a second click in the same spot would
select the "wall" below, and a third click would select the
"floor". If a fourth click where made, the cycle is completed
by the "ceiling" being the selected object again.
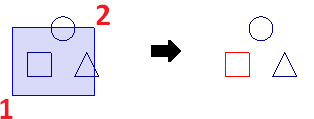
Moving to the
right after the first left-click creates a rectangle with a solid
border and light blue shading, indicating the Window
selection method. When using the Window
selection method, any object that resides entirely within
the window will be selected.
In the example at right, the square is fully contained and the
triangle and circle are not; thus only the square is made part
of the selection set. |
|

|
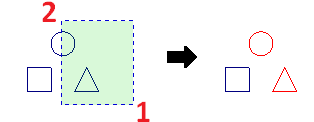
Moving to the
left after the first click creates a rectangle with a dashed border
and a light green shading, indicating the Fence
selection method. When using the Fence
selection method, objects having any portion within the fence
will be selected.
In the example at right, the triangle is fully contained, the
square is not contained, and the fence
crosses the circle; thus the triangle and the circle are made
part of the selection set. |
|

|
The Properties
tab will include the Selection
panel to assist in selecting objects
for Modify tab
commands. Visual defaults to adding clicked objects to the selection
set, signified by the Add Selection
button being highlighted in yellow. |
|
 |
The Properties
tab will include the Object
Filters panel to assist
in selecting objects for Modify
tab commands and other times when
objection selection is required; e.g. specifying a surface on
which to place a Calculation Zone.
A checkbox is present for each of the four object types. Unchecking
a box tells Visual to ignore objects of that type when selecting
objects. |
|

|
As both an
example of Object Filters and
a usage tip: Power Zones and Calculation Zones are often created
such that they are coplanar. When selecting either type for modification,
it is likely to be unclear which zone type has been selected.
To be sure which is selected, change to Transparent
Display Mode.
Secondly, use the Object Filters
to remove Solids. This allows
selection of a calculation point to select a Calculation
Zone or simply selecting "empty space" as shown
at far right to select the coplanar Power
Zone. (This example is selecting first the
Calculation Zone and alternately the Power
Zone.) |
|

|
The selection
process also allows objects to be removed from the selection set.
To toggle to the Remove selection
mode, press the Remove Selection
button or press the R
key on the keyboard while the pick-box
is active. |
|
 
|
In addition
to the Remove Selection button
being highlighted in yellow, the Status
bar will also indicate that the subsequently selected items will
be removed from the current selection set. |
|

|
Click the Add Selection button or press the A key to return to the Add selection mode if necessary. |
|
 
|
Clicking the
Select All button selects all
objects in the Design Environment.
Pressing the L key while
in selection mode also causes all objects to be selected. |
|
 
|
Clicking the
Previous Selection button or pressing
the P key while in selection
mode causes objects previously selected (in the last command executed)
to be selected again for use in the currently active command. |
|
 
|
The Pick, Window, and Fence
methods can be used repeatedly in both Add
and Remove modes until the selection
set contains only the desired objects. The process is terminated
with a right-click of the mouse, and Visual ends the command or
moves to the next step in the command depending on the command
executed. |
Command-specific information about selecting objects is found later
in the manual where necessary.


