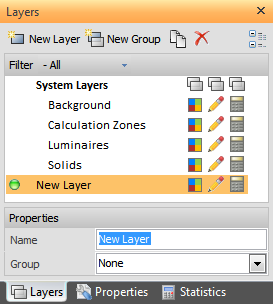
If it is not visible, the Layer Manager (Sidebar with Layers tab focus) can be shown by clicking in one of two places:

After clicking Group and Layer names, Properties can be edited in the Properties panel at the bottom of the Layer Manager.
The Layer Manager also contains a toolbar at the top with several buttons to add and manipulate Layers and Groups.

To make a Layer or Group active, and therefore have new Objects associated with it, double-click the Layer or Group name. Alternately, right-click and select "Active Layer" from the menu; see information below.
The active Layer or Group is signified by the green icon next to the name. This is separate from the yellow highlight.
Layers that are part of a Dynamic Group cannot be made active; the Dynamic Group is what is active and Visual places Objects on the appropriate Object Layer as they are created. Conversely, a Static Group cannot be made active; Layers that are part of a Static Group are made active.

A New Group can be created to organize Layers. The Group type can be selected as Static or Dynamic in the Properties panel at the bottom of the Layer Manager . See Layer Groups for more information.

Layers can be created by clicking the New Layer button at the top of the Layer Manager. Visual creates the new Layer temporarily and populates the Properties panel at the bottom of the Layer Manager with the preliminary name "New Layer". Focus is placed on this preliminary name so it can be easily renamed to something more meaningful to the current project.

Layers can be associated to a Static Group by clicking the Layer name to make it active and then editing the Classification Properties at the bottom of the Layer Manager to assign it to the desired Group. The process is undone by assigning the Layer to the "None" Group.
Layers can also be converted to a Dynamic Group such that all Objects on the selected Layer will be separated into the four Visual Object types.

To Copy a Layer or Group, select the desired items and click the Copy button at the top of the Layer Manager.

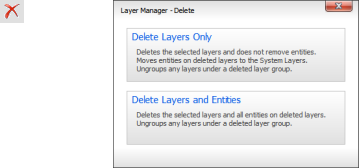
To Delete a Layer or Group, select the desired items and click the Delete button at the top of the Layer Manager.
Visual presents a dialog to determine if the deleted objects are to be removed or kept after the Layer is Deleted. Delete Layers Only will move the associated Objects to the appropriate Layers in the System Layers Group (i.e. Luminaires are placed on the Luminaires System Layer, etc.). Alternately, Delete Layers and Entities removes all entities on the Deleted Layer and the selected Layer.

Display of Layer Groups can be compacted by pressing the Collapse button in the upper right corner of the Layers tab to then only show Layer Group names. After the button is pressed it changes to the Expand button and will be highlighted in yellow. Pressing the Expand button reverts to the original state of showing all Layer names.
Groups can also Collapse and Expand by clicking (alternately) on the "-" and "+" next to the Group name.

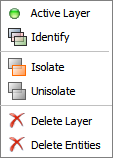
Right-clicking a Layer name will pop-up a menu showing multiple command shortcuts:
Left-clicking a choice operates on the selected Layer. Active Layer changes the Layer on which the right-click was initiated to the current Layer.
For more information on these and other Layer commands, see Layers Tools.
