The buttons for the various types of Masking can be found in the Calculations panel on the Home tab or the Masking panel on the Calculations tab of the Ribbonbar.

The Home tab button is dual function; the upper portion executes the command, the lower portion initiates a drop-down menu.
Once a selection has been made other than the default, the upper button portion will change to execute that command with the next press and the graphic is changed accordingly. Selecting one of the other commands from the drop-down menu will revert the button to that mode.

To Mask a Rectangular or Polygonal area, select the Calculation Zone to be Masked by clicking a point, the boundary, or in Transparent Display Mode, anywhere inside the boundary. Then select coordinates to include the points to be Masked, and right-click or press Enter to end the command.
At right, a Polygonal mask is applied to the corner of a parking lot. Note that the masking boundary does not always need to be artfully or carefully applied, it simply needs to encompass the points to be removed.

To Mask calculation points based on a surface, select the Calculation Zone to be Masked by clicking a point, the boundary, or in Transparent Display Mode, anywhere inside the boundary. The select the Solid Object to be used as the basis for the Masking, and right-click or press Enter to end the command.
At right, an apartment building (included to block light) is used to remove points in a site lighting project.

To Mask individual points, left-click the point(s) to be removed. Visual instantly removes the point, and allows for removal of additional points. Right-click the mouse or press Enter to end the command. Note that Visual will update Statistics after ending the command.
In the example at right, a calculation point is inside a column and should be removed.

Visual can be set to show the boundaries of masked areas. See Calculation Zone Properties for more information. Note that this border is a bit thicker than that of Calculation Zones themselves.
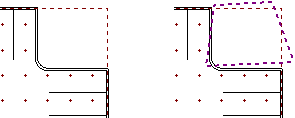
At right, the boundary from the Polygonal masking example above is shown with a dashed purple border.

See Unmasking Calculation Zones for information on how to remove Masking.