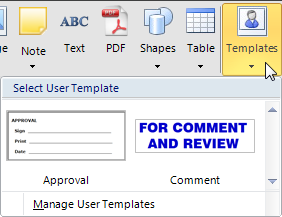
To insert a Template object, click the Template button on the Insert tab of the Print Editor Ribbonbar.
Clicking the button initiates the Template Dialog that allows for the choice of one of the pre-defined Templates.
Templates must first be created as described in Saving Templates and Defaults to be displayed and therefore inserted with this dialog. Templates may not exist on a given computer; Visual does not include Templates.
(Note that the dialog graphic at right has been modified for the purpose of this manual.)

Left-click the desired Template object from the dialog. Templates are placed by left-clicking the mouse in the desired location as described in Placing Objects.

Once placed, the object can be moved, edited, formatted or otherwise manipulated as normal. See the appropriate section in this chapter for information on any of the object types.

Using the dialog, clicking Manage User Templates initiates a dialog window that allows Template objects to be renamed and deleted.
To rename an object, left-click the desired object and click the Rename button at the bottom of the dialog. Visual will initiate a dialog to select a new name.
To delete an object, left-click the desired object and click the Delete button at the bottom of the dialog. Deletion cannot be undone.
(Note that the dialog graphic at right has been modified for the purpose of this manual.)
