The Place and Aim command can be found on the Luminaire tab and the Home tab of the Ribbonbar.

The Home tab button is dual function; the upper portion executes the command, the lower portion initiates a drop-down menu.
Once a selection has been made other than the default, the upper button portion will change to execute that command with the next press and the graphic is changed accordingly. Selecting one of the other commands from the drop-down menu will revert the button to that mode.

To insert a Luminaire, one must first be defined in the Luminaire Schedule. See The Luminaire Schedule Editor for more information.

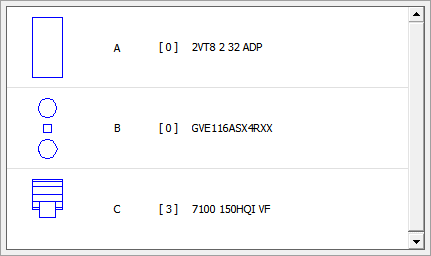
To Place and Aim a Luminaire, select a Luminaire Type from the graphical list. Select the coordinates desired for the Luminaire location with the mouse, keyboard entry or Object Snap. Visual then provides instant feedback by placing the aim point at the mouse crosshairs and shows the resultant Aiming Line and Luminaire orientation as the mouse is moved. Specify the aiming point with the mouse, keyboard, or Object Snap.
After a Luminaire is inserted with Place and Aim, Visual continues the command to allow for multiple insertions. To end the command, right-click or press Enter.

By clicking the Luminaire Type List during command execution, all defined Luminaire Types are shown and a selection can be made.
Symbol, Type, and Catalog Number are shown to identify types in complex projects.
Preceding the Catalog Number is a number in square brackets representing the number of that Luminaire Type currently inserted in the Design Environment.

Mounting Height is the distance from the Active Plane that the Luminaire will be inserted. Mounting Height is always applied in the z-direction. Changes to the Active Plane orientation (i.e. moving to the X-Z or Y-Z planes) will still result in the Mounting Height being applied in the Z-direction.

Orientation and Tilt are solely specified by user input at the Command Line in this command, most often with the mouse. The Orientation and Tilt parameter text boxes are accordingly inactive.

Aim to Surface (found on the Luminaire tab) is applicable to the Place and Aim command. Because in many floodlighting applications it is necessary to have the Luminaire aimed onto a specific surface, Visual can determine when the mouse is placed "over" a Solid Object and the Active Plane can be automatically and temporarily changed to the plane of that Solid Object such that when the mouse is clicked the aiming point is placed in the plane of that Solid Object.
