The mouse crosshairs can be a fraction of the screen or extend to the Design Window boundary. See Settings Drawing Aids.
The values at the bottom of the screen are the (X,Y,Z) triplet location of the mouse pointer, and to the right of that, the horizontal and vertical viewing angles.
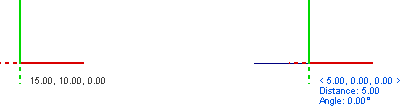
In this section, note the crosshairs in each view. The colored solid-line axes indicate that the mouse pointer is currently moving in that plane. Red is always the x-axis, green the y-axis, and blue the z-axis.
The solid crosshairs are a reminder showing the positive direction in those axes.

The mouse pointer always moves in two orthogonal (perpendicular) dimensions defined by the mouse crosshairs. The mouse crosshairs can appear perpendicular or skew on the screen depending on the view.
For example, the left image is a plan view and on the right the image is of the SouthEast 3-D view of the same object.
![]()
It is possible to change the plane of movement in 3-D views as depicted in the figures at right. Pressing the Tab key while the mouse pointer is in the Design Window causes the pointer to cycle through the three cardinal planes of movement (X-Y, X-Z, and Y-Z).
In both the 3-D views at right, the mouse pointer is in precisely the same location but the plane of movement is different. The crosshairs indicate the plane of movement. When the Tab key is pressed to change the plane of movement, the coordinate of the inactive dimension becomes fixed at its present value. The mouse pointer is said to be moving in X-Y, for instance, at Z = 10. This is referred to as the working plane.
![]()
It should be apparent that any 3-D location can be pinpointed from a single view by moving sequentially through different working planes. A floodlight mounted at grade, for instance, can be aimed into the plane of a vertical facade by moving the mouse pointer in the horizontal (X-Y) plane to the base of the wall. Then, by pressing the Tab key to change the working plane to that of the wall, the mouse pointer can be simply moved upward to locate the desired aiming point.
Occasionally it is convenient to remain in the same cardinal plane of movement such as X-Y, but a different location in the fixed Z dimension is desired. Pressing the Up Arrow and Down Arrow keys changes the working plane in this way. It shifts the working plane one snap increment at a time in the direction of the perpendicular axis. The Up Arrow is positive and the Down Arrow is negative as defined by the coordinate axis in question.
Another important key to remember is the Home key. Pressing the Home key at any time returns the working plane to X-Y, at Z = 0 (ground level).
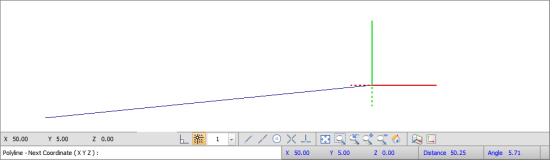
In a command, Visual displays the relative coordinates of the crosshairs with respect to the last coordinate entered. These values are shown in blue at the bottom of the Status Bar. Cartesian and polar coordinates are always provided.
At right, in the Line command, Visual shows (in blue) that the mouse has moved 50 units in the X-axis, 5 units in the Y-axis, and 0 units in the Z-axis since drawing is done in plan view. Note that the global coordinates are also (50,5,0) because the origin of the Line is at (0,0,0).
Visual can display both Absolute and Relative Coordinates in conjunction with the crosshairs. See Settings Environment for more information.